Over the years, I have written a large number of tutorials for other websites, and I’ve decided to update them all and include them here on my blog as well in a new “Tutorials” section. I will make it my goal to add Tutorial posts periodically (until I run out, anyhow 😉 ), starting with this most basic one. That way, if you like, you can follow along and practice each for a month before I post the next one. Have fun!
![]()
![]()
Taking control of your camera—learning to make your own exposure decisions instead of letting your camera make them for you—is perhaps the biggest step you can take in order to bring your own photographic vision to life. And the crux of shooting in manual—in fact the crux of photography itself—is the exposure triangle: the relationship between ISO, shutterspeed, and aperture. Composition and focus aside, every shooting decision you make affects how much light will be recorded onto your “film,” which in the case of digital photography, is your camera’s sensor.
The three facets of exposure for both digital and film cameras are ISO (which correlates to film speed), shutterspeed, and aperture. In selecting the exposure for any given shooting situation, you need to choose some combination of the three that will yield what you consider the best exposure for your vision.
ISO
The simplest of the three is ISO. The different ISO numbers affect the “light gathering” capabilities of your camera. A high ISO (around 1600 on entry level cameras, and as high as 12800 or even 25600 or greater on professional-level cameras) can “gather” light much more quickly in darker situations, whereas a low ISO works in very bright situations where you don’t need so much light to be “collected” by the “film” (sensor).
![]()
.jpg "JRH_0376-EditBlog")
 Tamron 28-300 f/3.5-6.3 at 300mm, ISO 100 (a very bright day), f/6.3, SS 1/200
![]()
.jpg "JRH_2384Blog") Tamron 28-300 f/3.5-6.3 at 28mm, ISO 12800 (a dimly lit room at night), f/10, SS 1/25
Tamron 28-300 f/3.5-6.3 at 28mm, ISO 12800 (a dimly lit room at night), f/10, SS 1/25
It is best to shoot at the lowest ISO you can while keeping your shutterspeed reasonable for handheld photography (unless you are using a tripod, of course) and keeping your aperture as low (wide) as you choose for the situation. Unlike aperture (which affects depth of field) and shutterspeed (which records any movement that occurs while your shutter is open), the only real effect that ISO has on your images is to make them brighter or darker overall. Just keep in mind that the higher the ISO, the more noise you will have in your final image. (Remember that it is always preferable to expose properly with a high ISO than it is to underexpose in order to keep a lower ISO—bumping exposure in processing adds worse noise to your image than the natural high-ISO noise!)
SHUTTERSPEED
The second part of exposure is shutterspeed. Shutterspeed is the amount of time your shutter is open, during which your image is recorded onto the film or sensor. A fast shutterspeed is needed to sharply record faster-moving subjects such as athletes and even busy children. Any time you handhold your camera—even with still subjects—you need your shutterspeed to be fast enough to compensate for slight movements you invariably make while pressing the shutter button. (A baseline rule of thumb is to keep your shutterspeed at or above your focal length: If you are shooting with a lens at 50mm, you’d want your shutter at 1/50 or faster, and if you’re shooting with a 200mm lens, you’d want your shutter at 1/200 or faster.)
Shutterspeed can be used to create unique images. A very fast shutterspeed can freeze a moment in time—a leaping ballerina mid-air, the tiny droplets of water in a fountain, or the crown created by a droplet hitting a liquid surface. A slow shutterspeed, on the other hand, can make moving water look beautifully smooth and silky. You can also use a very slow shutterspeed to record star trails, fireworks, car headlight trails, or even writing with light—a quick internet search will yield lots of information on achieving these fun looks.
![]()
 Tamron 28-300 f/3.5-6.3 at 28mm, ISO 12800, f/11, SS 1/13 (Note how silky smooth the water is.)
![]() Tamron 28-300 f/3.5-6.3 at 65mm, ISO 100, f/8.0, SS 1/320 (Note the individual droplets of water.)
Tamron 28-300 f/3.5-6.3 at 65mm, ISO 100, f/8.0, SS 1/320 (Note the individual droplets of water.)
APERTURE
The third point of the exposure triangle, aperture, is perhaps the most complicated (and exciting!) piece of the puzzle. Aperture refers to how large a “hole” your lens will open up to allow the light in to hit the sensor. The larger the opening (and the lower the number, for example 1.4 or 2.8), the more light that’s allowed in and the smaller the depth of field; conversely, the smaller the opening (and the higher the number, say 13 or 22), the less light that is allowed in and the greater the depth of field. Depth of field is the depth (or “amount,” in distance from near to far) of sharpness within an image. In a portrait, for instance, you might want a very “shallow” depth of field so that only the nearest eye is in focus but other parts of the face are softly blurred, or you might want a slightly greater depth of field so that the whole face is sharp but the background is blurred. For a landscape, you might want a great depth of field so that the entire scene is in crisp focus. So aperture, like shutterspeed, can be used creatively.
![]()
Canon 85L, ISO 2500, f/2.2, SS 1/30 (Only what’s reflected in the glass of the lens is sharp—the very front of the rim of the lens is blurred, as is her pinky which is just behind the outermost rim of the lens.)
![]()
Tamron 18-270 f/3.5-6.3 at 17mm, ISO 400, f/22, SS 1/50 (Everything is in focus, from the foreground all the way to the horizon.)
Further complicating the discussion of depth of field, though, is the fact that it depends not only on your aperture setting, but also on how far your camera is away from your subject. At the two extremes are macro and landscape photography. When shooting macro, even what would normally be considered a high aperture will yield a fairly slim depth of field, measurable in millimeters; on the other hand, subjects that are quite far away will be have a significantly greater depth of field with the same aperture setting. Most cameras have an aperture preview button to help you judge your depth of field; refer to your camera’s manual. (Don’t be alarmed when you press that button and your image darkens in the viewfinder. The camera is “stopping down” to show you how far the shutter will close; the preview doesn’t take into account that you will also have adjusted your ISO and/or shutterspeed to compensate for the less light hitting the sensor through the smaller hole.)
The following images were all taken with the same lens (Canon 100L) at the same aperture (2.8); the only change was my distance from the subject. See how the depth of field widens the further you are from your subject?
![]()
ISO 1600, f/2.8, SS 1/40, camera about 8 inches from subject (Note how sharp the front of the image is, where the champagne meets the glass, versus how quickly the focus blurs as you follow the glass backwards in the frame.)
![]()
ISO 400, f/2.8, SS 1/40, camera about 4 feet from subject (Note that the arm of the chair and the flowers are in focus; focus drops off as the chair leads back to the outer edge of the frame.)
![]()
ISO 100, f/2.8, SS 1/1000, camera about 15 feet from subject (Note the quilt a bit in front of the subject, her entire body, and even the flowers just behind her are all in focus.)
Another variable when considering aperture is how far your subject is from the background. Pulling your subject away from the background will increase the blurriness of your background, even with the same aperture. Your depth of sharpness remains the same (assuming the camera is the same distance away from the subject), but the subject is now further from the background, rendering the background fuzzier.
![]() Canon 100L, ISO 800, f/2.8, SS 1/125, subject about 1 foot away from wall behind her (All of her is in focus, and the wall is also fairly well in focus.)
Canon 100L, ISO 800, f/2.8, SS 1/125, subject about 1 foot away from wall behind her (All of her is in focus, and the wall is also fairly well in focus.)
![]() Canon 100L, ISO 200, f/2.8, SS 1/125, subject about 8 feet from shrubbery behind her (This was the same lens and the same distance from camera to subject, but the subject is pulled away from background to achieve more background blur.)
Canon 100L, ISO 200, f/2.8, SS 1/125, subject about 8 feet from shrubbery behind her (This was the same lens and the same distance from camera to subject, but the subject is pulled away from background to achieve more background blur.)
Similarly, zooming heavily on a subject that is some distance away from you and from the background can simulate a wider aperture even on a lens that doesn’t open terribly wide. I find this very helpful when shooting with my variable aperture travel lens, which is a super zoom lens that doesn’t have a very low minimum aperture. As long as I can get far enough away from my subject and zoom in, I can create very pretty bokeh (the term for that background blur) even without that low aperture.
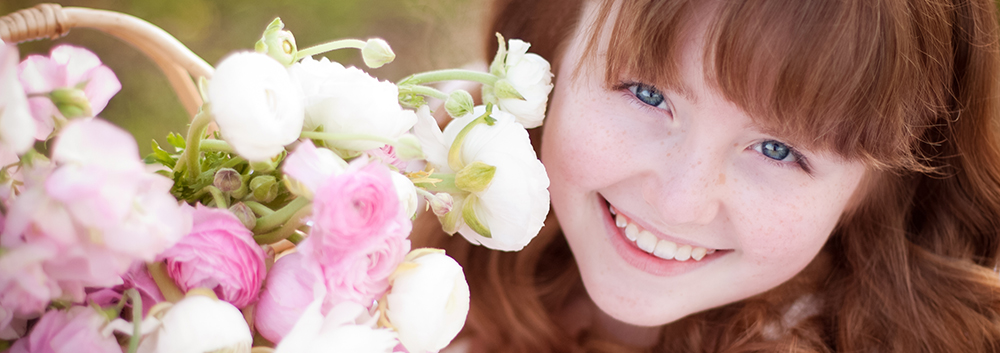
![]() Tamron 28-300 f/3.5-6.3 at 208mm, ISO 640, f/6.3, SS 1/1250 (See how slim the depth of field appears to be? The center of the front flower is sharp, but the other nearby flowers are more blurred, and the background is quite soft.)
Tamron 28-300 f/3.5-6.3 at 208mm, ISO 640, f/6.3, SS 1/1250 (See how slim the depth of field appears to be? The center of the front flower is sharp, but the other nearby flowers are more blurred, and the background is quite soft.)
PUTTING IT ALL TOGETHER
To determine exposure when I am shooting, the first question I ask myself is what look I want to achieve with my image. Do I want to freeze or blur motion? Then my most important variable is shutterspeed. Or is bringing focus to my subject via a slim depth of field my biggest priority? Or is it providing a wide depth of field to showcase a landscape? Those scenarios would make aperture my deciding factor. From there, I select the lowest ISO I can while keeping my third variable reasonable (meaning if my third variable is shutterspeed, I need to make sure it doesn’t go too low for a hand-held image, or if the third variable is aperture, I need to make sure it stays reasonable to carry out my intended vision of the image).
Exposure, as with most aspects of the art of photography, is all about the photographer’s vision. Even within the realm of correct exposure, you will see great variation in style. I generally prefer my images to be quite bright, sometimes verging on overexposed (I don’t overexpose the main subject of an image, but I don’t mind an overexposed background if that’s the only way I can achieve proper exposure on my subject). Other photographers prefer darker images (sometimes with shadow areas verging into complete blackness with little detail, to really pull focus to the subject), lending their work more drama and deeper intensity. Both are correct exposures, but the feel varies tremendously, showing that even in the more technical aspects of photography, there is always room for artistic expression!
I’m hope this will give you a solid start in shooting manually. It feels cumbersome at first, but I promise with practice you will find yourself not even thinking about it after a while! I am happy to answer any questions you might have; ask away in the Comments section!
.jpg)
.png)
.jpg)
[…] can take them far beyond the basics of exposure and the rule of thirds. Emily has learned all about using the exposure triangle to expose not only correctly but creatively. And I have begun talking with her about leading lines and negative space, about “framing” your […]